Rifle Scope Guide2: Mounting Glass
[su_heading size=”30″]Now that you’ve bought a new scope, it’s time to affix it to your rifle, a daunting but not impossible task for marksmen.[/su_heading]
If there’s any one trend I see a lot of as a professional precision rifle instructor, it’s improperly mounted riflescopes. If we look at what a rifle scope is from a fundamental standpoint, it’s a mechanical aiming device that gives us the ability to bring a distant target up close and personal, which in turn allows the shooter to pick a relatively precise aiming point that the shooter hopes to put a bullet into if everything else goes well.
It’s a complicated process that requires a custom fit, and it’s not always something you should leave up to the guy behind the counter at your local sporting goods store. As a matter of fact, if you’re leaving a rifle to have the scope mounted for you, you’re getting off on the wrong foot about as soon as you walk away from the counter.
Mounting your rifle scope isn’t an overly complex task, and with the right tools and some very basic knowledge, it can be done properly, with little to no stress.
Before we do anything with the rifle scope, we need to adjust the rifle’s length of pull (if it’s adjustable) to your body type and structure. I do this without a scope on the rifle simply because if there’s a scope on the rifle, nearly every inexperienced shooter out there will sacrifice a comfortable shooting position to look through the optic.
Not a good starting point because we’re all different sizes and shapes. Precision rifles aren’t a one-size-fits-all affair. Make sure your cheek is centered on the rifle’s cheek piece, and your shooting hand can comfortably reach the grip without a severe bend in the wrist, which can inhibit proper trigger manipulation.
Make adjustments as necessary, and check this fit in a couple positions outside the prone or the bench to make sure that as your position changes the rifle fit works for them all, with only minor tweaking of your head position on the cheek piece.
Now, we’ve established a baseline by properly adjusting the rifle to fit our body, not the other way around. If your stock isn’t adjustable, that’s OK, we’ll get to how to set eye relief for comfort in a bit.

MOUNTING A RIFLESCOPE STARTS with having some simple tools at your disposal. A set of Allen and Torx head drivers, a torque wrench, some blue Loctite, and a simple scope leveling kit is really all you need, aside from your regular shooting gear. Your scope mounting base, or the piece that attaches to the action, should come with the required fasteners, as should your rings.
Don’t ditch the instructions either; you’ll need those to get the proper torque specs for your selected parts.
The mounting of the base to the action is really the weakest point in the system if you don’t have an integral rail like you’d find on an AR, or most custom bolt-actions. It’s a good idea to test fit your scope base screws to see if they’re the correct length for your base and action.
Most of the time this isn’t an issue, but in the event that it is, you’re looking to make sure your bolt closes without contacting any of the front action screws, and that the rear screws don’t protrude below the surface of the inner dimension of the action.
Once that’s all good, degrease the mount and the top of the action with some solvent, and dab a little bit of the blue Loctite on the screws.
Start with the inner screws on the action, the ones just in front of and behind the action’s ejection port, and work your way outwards.
Get each fastener just hand tight, working from inside to out.
Once that’s done, apply the proper torque value as per the manufacturer’s
instructions. You’re done. Blue Loctite on your base mounting screws is the cheapest insurance you’ll ever buy for your scope mounting system.

NEXT, WE’RE GOING TO LEVEL up the rifle using the bare base, and a scope leveling kit from Weaver. This kit is simple and cheap, and if you’re going to be mounting rifle scopes, or swapping scopes a lot, it’s a kit you should always have in your range bag.
Bag up the rear of the rifle, and apply some tension to your bipod’s cant adjustment so it doesn’t flop around. Place the barrel level clamp on the barrel and get the level close. Next, put the action level on the base, and move the rifle so the level is true.
Then adjust the fine-tune feature on the barrel level to true level. Now we have a reference level to go off of when we take the action level off the base and set it aside for later. The next step is to take a look at where we need to put the rings on the bases to make room for a couple things.
We want to make sure that the scope’s objective bell housing isn’t going to contact the front of the mounting base, and we want to make sure that we can slide the scope fore and aft in the rings about a quarter of an inch to adjust for optimal eye relief.
Pull the top caps off the rings and set them aside, careful to keep the front top cap with the bottom of the front ring, and the same for the rear rings. It’s not necessary, but I’m kinda OCD about this.
Install the rings to the bases in the correct slots that we’ve established from the previous step. I like to keep the fasteners on the opposite side of the bolt for bolt-action rifles so I don’t tear up my knuckles when I manipulate the bolt. Using one hand, slide the rings forward in the mounts to keep that forward mounting surface on the ring engaged with the mount, and then apply the proper torque value as per the manufacturer’s instructions.
Repeat for the rear ring. If you’re using an unmount system, just make sure the entire mount is slid forward in the mounts.
Under the forces of recoil, that mount wants to go forward while the rifle moves rearward. Any small space in there for the rings to get a running start at the base, it’ll eventually work itself loose.
Now, most will say that it’s time to lap the rings, and I’m here to tell you, you’re wasting your time. You might actually be doing damage to those expensive rings you just bought by lapping them and not having the experience and know-how under your belt to know when enough is enough.
Modern machining technology is advanced enough that your rings are cut and
bored from one piece of material. Mounting bases, although there is a slight possibility that they could be warped, are consistent enough now that I don’t give it a second thought.

FROM HERE, YOU’LL PLACE THE scope in the rings, and put the top caps on. Insert the fasteners and tighten until there’s just enough friction on the scope body that the scope doesn’t roll or flop to the side. Making sure that the scope is on the maximum magnification setting, get behind your rifle and with your cheek in the position it was when you set the rifle’s length of pull, move the scope fore and aft in the rings until you have a full field of view without any shadows. Check this outside of the prone or the bench position in the standing and kneeling positions to make sure you don’t have any surprises in the field when you try to obtain a sight picture.
Now we have the eye relief set for that magnification, which will be the shortest possible eye relief for that optic. (Eye relief changes with magnification – more on that in another installment.)
From here, we need to tighten the ring top caps to hold the rifle scope in place permanently. Get the rifle back on the bench and bag up the rear end.
Now we’ve got to level the rifle using our baseline established with the barrel level. Once that’s done, we need to now level the rifle scope to the rest of the world.
This can be done in two ways, and it depends on how you’re going to be using your scope. If you’re dialing your turrets, it’s best to level the scope from the turrets. If you’re using a reticle for holdovers, it’s best to use a plumb-bob, or some other vertically plumb surface, at about 50 yards from the objective lens to level the reticle.
Either way, we’re leveling our aiming system to track true with the vertical plane of the rest of the world. Plumb-bob leveling is a bit trickier, but you’ll get the drift of that after we talk about turret leveling.
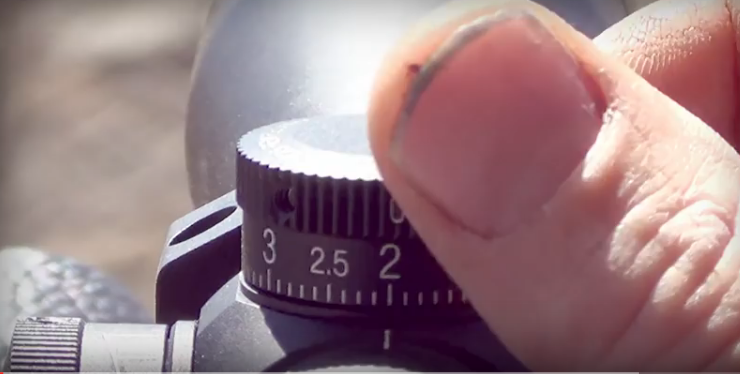
Place your level on top of the elevation turret, and rotate the scope so that the top of the turret is level with the barrel level.
Now comes the tricky part, which is applying tension to the ring top caps without pulling the scope out of level. Some rings are better at this than others. American Rifle Co.’s clamshell-style rings with a single fastener can be tightened without pulling the scope out of level.
Traditional four-screw top caps require some more finesse.
Start by making sure that there’s an equal space between the top caps and the bottom of the ring. We don’t need feeler gauges here, folks, just an approximate. Start by tightening each screw in an X pattern, and only apply a little tension at a time, keeping your eye on the turret and barrel levels.
Once you’ve gotten the screws tight enough that the final torque application isn’t going to move the scope, using that same X pattern, apply the proper torque setting as per the manufacturer’s instructions. Repeat this for the rear ring.
GUESS WHAT? YOUR SCOPE IS now mounted, with a custom fit to your body, your eye, and your comfort. I can’t stress enough about how important this process is. If I had a dollar for every rifle scope that was improperly set up on a student’s rifle, my son would have a pretty healthy college fund set up by now, and he’s seven.
As shooters, one size doesn’t fit all, even though most people think that’s the way it is. Setting yourself up for success with a rifle starts at ground zero by making sure your components are properly set up, not only mechanically, but for your body and eyes.
Precision shooting requires a very systematic approach to everything we do with that rifle. Consistency equals accuracy, and in order for shooters to be consistent, they need to be set up for success and step off on the right foot.
Story and Photos by Caylen Wojcik
Leupold VX-6 HD Multi Gun Scope

Vortex Viper PST 2.5-10×32 FFP