

With masks initially hard to come by, American Shooting Journal’s Resident Tinkerer decided to Improvise.
Story and Photos by Frank JardimAs we all know by now, a respirator or mask is most useful for protection when you must be in close quarters with one or more people. That’s why they are a must for healthcare workers and it looks like we’ll be seeing more mask mandates for the general population. If you have to wear a mask in public, my feeling is it might as well be a good one.
At the start of the Covid-19 epidemic, demand for masks worldwide outstripped production capacity and prices jumped to outrageous levels, prompting many of the handier types, like myself, to some do-it-yourself improvisation. Some DIY was better than others, but any mask was better than no mask at all, even if it was just an old T-shirt tied over your mouth and nose. Unfortunately, most DIY and commercially produced masks, even many N95-rated types, had what appeared to me to be a serious flaw in their fitting that made them seem little better than an old shirt tied across the mouth and nose!
Anybody who has ever worn a facemask over their mouth and nose to do dusty work, like cleaning a chimney or spraying paint, should recall the dirt that collects on your skin on each side of your nose where the facemask doesn’t fit tightly against the skin. When you draw a breath, the incoming air moves more easily through these gaps than through the filter material, and it leaves the evidence on your face in the form of ash, paint – or perhaps Covid.
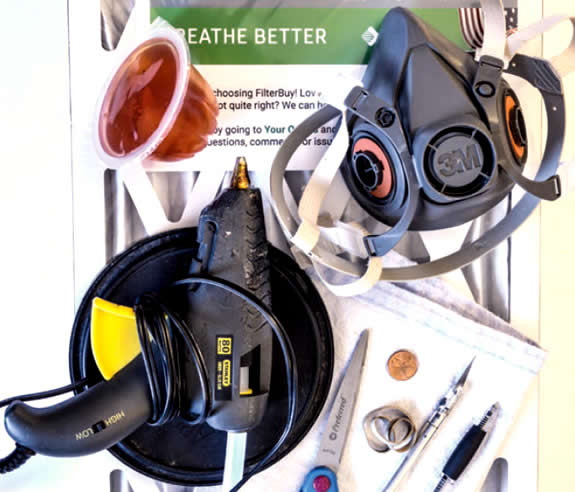
Even with their flawed fit, these masks will do some good, but not as much as one that is well sealed and draws all the incoming air through a filter. Painting respirators seal against the face much better around the nose and ears than surgical masks and offer more protection. I got the idea to adapt one of my old silicon rubber painting facemask respirators to the job of Covid protection. In fact, this mask would have worked fine for this purpose with its original filters, but those are expensive and I need them for painting because the paint solvents and other chemicals will do me immediate harm if I breathe them in.
TO IMPROVE THE protection of any DIY mask, a doctor friend advised me to repurpose the fabric filter material in a quality household MERV-13 (or higher) HVAC filter. Take apart the filter and remove the fabric from the wire support. Cut out two or three pieces of the appropriate size for your application.
Since the common MERV-13 filter is only designed to capture 50 percent of the smallest particles, use two or three layers in your mask to increase the percentage of particle capture. The material itself is good for months of use, but can become contaminated with the virus. Allowing the virus 12 hours of alone time to die is best for decontamination. Washing will damage the filter fabric. If you have two masks, you can alternate between them.
For a typical “doctor-style” surgical mask, attach the HVAC filter layer to the inside by applying common white craft glue to the edges. For commercial-style, soft silicon rubber half-face respirators like mine, you can use the exhausted filter canisters if you can still draw a breath comfortably through them. Upgrade them by attaching the HVAC filter fabric over the top of the canister. A rubber band will do the job. Add an outer dust cover of conventional fabric to keep the HVAC filter material underneath clean.
I’d thrown out the old filter canisters for my respirator (who would have thought I’d need them?), so I improvised new ones from the plastic cups of single-serving Jell-O my wife puts in our children’s lunches. Of course, I ate the Jell-O first. If your old respirator filters are hard to breathe through, cut them open and remove the exhausted filter materials. Most of that stuff inside is charcoal, which we don’t need since our concern is just the tiny droplets of moisture that the virus rides on during expiration, rather than brain damage from paint thinner.
HERE’S A STEP-BY-STEP guide to how I adapted my old respirator for economical pandemic protection.
- Step 1 Gather materials. A household 24-inch by 12-inch by 1-inch MERV-13-rated filter costs about $9 and when disassembled provides high-quality filter material for 12 surgical-style masks. If someone in your home suffers from allergies, you may be using this type of filter right now. For the most protection, start with a mask that seals airtight to your face so you breathe through the filter, rather than around it.
- Step 2 I wish I hadn’t thrown out those exhausted filter canisters for my painting respirator! I improvised new ones from Jell-O cups. It turned out a penny was the perfect size template for the mounting hole. Cutting and notching was done with an X-acto.

- Step 3 Thee plastic of this single-
serving Jell-O cup was surprisingly heavy and sealed up well against the respirator’s gasket. In the four months that I wore this mask for three hours a day, five days a week, the Jell-O cup canisters never broke off.

- Step 4 No need to gut an exhausted filter canister if you can still breathe through it. Cut two or three layers of new HVAC filter material to cover it. Using can lid templates, I cut two layers of filter for my improvised canisters and larger dust covers from old flannel sheeting.

- Step 5 Make sure the new filter material is attached so the air passes through it, and not around it. I made a ring of hot glue halfway down the inside of the Jell-O cup for my first layer.

- Step 6 You need to get the filter in place fast before the glue cools. Don’t burn yourself.

- Step 7 I also applied hot glue to the edge of the Jell-O cup and glued on my second layer of filter material.

- Step 8 To keep the HVAC filter material clean, I covered it with a piece of cotton flannel and secured it with a rubber band.

- Step 9 the dust covers were made from old sheets my kids loved, the intent being to make the respirator less scary to them. Even with three layers of fabric, I had no difficulty breathing.