

Yes, it all started with the Baker Rifle and the British 95th Rifle Regiment and Shaped the Way we Fight with our Rifles.
The defining moment for rifles in the western world was when Rifleman Thomas Plunkett serving with the British 95th Rifle regiment took a shot with his Baker rifle towards the end of the Battle of Cacabelos in 1809.
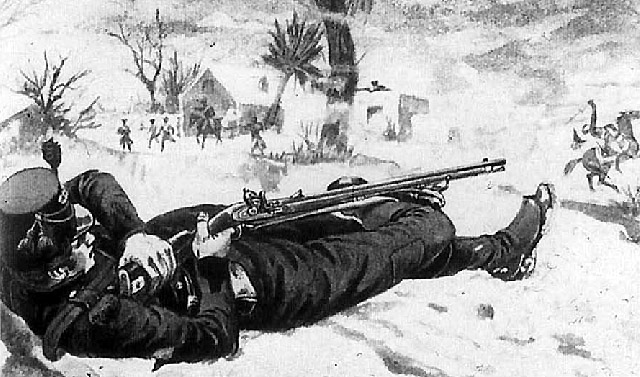
Rifleman Plunket laid flat on his back in the snow took a shot at the French General Auguste-Marie-François Colbert.
While he lay on the ground, Plunket inserted his foot into the sling of his Baker .705-caliber rifle to stabilize the weapon, the butt of his rifle flushed into his shoulder and took aim using only his marksmanship skills and iron sights.
Plunkett squeezed the trigger, and a moment later the general fell dead at 600 yards away. Then Plunkett reloaded and ran back to cover and took another shot that killed a second French officer who rode to Colbert’s aid.
This feat catapulted the capability of the basic firearm used by a soldier, led by the Baker rifle. The Baker rifle was not the first rifle invented, as there were other muskets used in the previous century with less accuracy. The Americans and Germans learned ways to use it with deadly effectiveness.
These previous “smoothbore” muskets had dominated the European battle fields before the Baker rifle came along. The big deal now is that the British had a weapon that can kill from a longer distance and be mass-produced.
Differences between the “smoothbore” and the rifle is that, the rifle had special cuts (rifling) inside the barrel. Which causes the bullet to spin, the spinning of the bullet enhanced the accuracy of the shot.
The British may have learned these hard lessons about rifles in the hands of skilled marksman during the ‘American Revolution’.
In 1777 at the Battle of Saratoga, Timothy Murphy (American Sniper) a crack rifleman with Morgan Riflemen, who had accompanied Gen. Daniel Morgan to thwart British Gen. John “Gentleman Johnny” Burgoyne and his invading Army. Murphy climbed a tree, took careful aim at the extreme distance of 300 yards with his Kentucky rifle, and fired four times. The first three shots missed and the fourth hit General Fraser in the stomach and he died that night.
The demoralized British retreated and the Americans won a victory that rang around the world, convincing the French that the cause of independence was worth backing with money, supplies and troops.
By 1798, the British Army’s Board of Ordnance began planning a soldier-proof rifle with deadly accuracy for specially dedicated marksman.
By the 1800’s the British army comes out with the Ezekiel Baker rifle, its patterned after the Jäger rifle. The Baker rifle worked very well for the 95th Rifle Regiment. The regiment main focus was on killing anyone responsible for command, control and communication on the battlefield. Slowly the rest of the world begin to realize the riflemen were the “future of warfare“.
For all soldiers out there, please tip your helmet to honor the Baker rifle and the troops who carried it. Just like the USMC rifle creed, the rifle is your best friend and life, take care of it and it will take care of you whether you’re a soldier or hunter.
Video Transcription
Today we’re going to test out various fire position for the Baker Rifle, as found in contemporary texts of the early 1800s.
The nature of soldiering provided by the 95th rifles and other light infantry units demanded that the men be exercised in and familiar with a range of firing positions, according to the ground they found themselves operating in. To today’s soldier, these issues are somewhat of a non-issue, but to the infantry of the early 1800s, they were the preserve of the lightbulbs (?) We’ll examine some of these positions as found in period artwork.
The most comprehensive image I have found is this one, showing the Standing, kneeling, sitting, prone, and supine positions. I also drew on the book, “Twenty-three Years Practice and Observations with Rifle Guns”, by the man himself, Ezekiel Baker. Using this artwork and supporting documentation, I’ll attempt to recreate these positions and provide some comment as to their effectiveness.
The Standing Position
As a form of ‘control experiment’, I elected to go first with the standing, unsupported. The saline points of this position are the fact that the rifle is supported completely with the muscle of the left and right arms. It does have the advantage, however, of being very quick to adopt.
The next example is somewhat peculiar, in that the sling is looped underneath the left elbow, with the left forearm braced under the forestump. My initial thoughts were that this position was not going to be particularly effective. I was to find out through practice that it did provide some degree of stability. The benefit I did find was that the left arm, sling, and rifle became one unit, and therefore the position was slightly more stable. I did find, however, that due to the adjustment size of my sling, bracing my left forearm underneath the forestock was somewhat problematic, and having to straighten the wrist, which led to instability. I decided to shorten the sling length by some six or eight inches. This I found to be most effective in creating a more stable and more easily adopted firing position.
As noted here, the smaller sling length enabled my arm to wedge itself more effectively and comfortably underneath the forestock. This made the position more comfortable, and less fatiguing.
The next variation of the standing position was based on this piece of artwork. While more a stylization of a rifleman of the era, rather than an actual example, it does provide an interesting example of a standing position.
This variation has one particular key feature that factors importantly in accuracy from standing position: The fact that the elbow is held close to the body, with the bone of the left forearm supporting the weight of the rifle, is important in providing maximum stability. The variation whereby the thumb and the finger is used to support the rifle is better substituted by this version with the hand placed flat underneath the forestock. The point is demonstrated well by this demonstration. Here, the left arm uses muscle to support the rifle, whereas here, the left arm is held close to the body, and the bone of the left forearm supports the weight. This version is in fact more stable for accurate shooting from a standing position.
As a way to bring the analysis of positions full-circle, I elected to demonstrate the use of a more modern technique. Here, the sling is wrapped up into the left armpit, with the left wrist placed in front of it. This method has the benefit of the previous two demonstrated. One, the sling is used to help support and create a bond with the arm, creating stability; and two, the elbow is held close to the body, providing that bone support, versus that of straight muscle. With practice and a properly-adjusted sling, this is the most effective standing position for longer-range non-snapshooting applications. Of course, as it is mentioned in period texts, the standing position is not the best for overall accuracy. It does, however, provide the firer the advantage of shooting over cover, as is demonstrated here.
The Kneeling Position
Period writings indicate that this position was more desireable, and should be used whenever possible. It gave the firer an intermediate position between the unstable standing position, and the slow-to-adopt prone or supine. Loading could also be achieved without the difficulty of the prone position, and in fact, with not much more difficulty than in the standing position. In my experiments there was one aspect of this position which is shown in the artwork that I found very difficult to incorporate. All of the artwork illustrates the firer with his body forward, off of the right heel. In practice this is not stable, comfortable, or easily adopted by me. Typically, I adopt a position as illustrated here. This upright position is at odds with the more conventional ‘sitting on the heel’ position, or even sitting on the foot. There are aspects of the artwork that bear mention. The position of the left elbow sitting with its back on top of the knee, with the leg and arm as close to being in-line as possible is well-illustrated. Here I demonstrate a version of the kneeling position where the body is raised off of the elbow and knee. Not only is this type of kneeling position inherently unstable -as unstable, in fact, as the standing position- but I also could not find a single example of any artwork depicting this style of kneeling position.
The Sitting Position
This little-known position appears in this period artwork. This version is quite conventional in nature, and although it provides good support for both elbows, it suffers from a difficulty of adoption. Perhaps the most awkward feature of this position is the almost bionic strength required to get out of it.
The Prone Position
A key feature in all period artwork is the use of the prone supported position. In this version, the shako is almost ubiquitously used to support the forend of the rifle. This is a good field-experient method, as every soldier would have had one. But for purposes of the experiment, I’ll go first with the unsupported version. Here, the rifle is only supported by the arms. Overall, the position is readily adoptable, though loading from the prone position by rolling onto one’s back can be a little bit difficult at times. Though stable, it’s not as stable as using the prone ‘supported’ position.
I don’t have a Shako, but what I’ve done is used my aiming rest to mimic the presence of the piece of headgear underneath the forend of the rifle. This helps steady the rifle, and make your shot all the better. I thought I’d make mention of the three different places one can place the rest. The first: under the hand, the second: under the forestock slightly in front of the hand, and the third: right out at the end of the forestock, much like a modern bipod. It’s important to note that each of these positions will change the point of impact to some degree. It’s worth noting that the body position specifically isn’t talked about in any of the texts that I read, but the illustrations seemed to indicate that the body was placed straight behind the rifle. The more modern versions have the body angled behind the weapon, and either the legs placed flat on the ground, or the right leg hooked.
The Supine Position
To modern shooters, the Supine position may seem somewhat arcane, but its use was widespread sometime in the nineteenth century, and continues to this day in the long-range black powder community. There are a number of versions shown in artwork, the first of which we’ll deal with is the use of the sling to support the rifle. The foot placed inside the sling, and the hands pulling back at the wrist of the stock, an effect much like the bracing of a biplane’s wing is achieved. For safety, the sling must be shortened so that the muzzle protrudes past the sole of the foot. The hands are then free to pull back at the wrist of the stock, and aid in the alignment of the sights. To this end, the feet can also be used to adjust the elevation of the barrel, with high, medium, and low positions. Overall, I found this version of the supine position to be somewhat difficult to adopt, with the pushing and pulling aspect fatiguing the body. The use of other methods proved to be more suitable.
Using the left leg to support the rifle was one such method.
Though not a piece of period artwork, it did serve to demonstrate the use of the left leg. With the left leg bent and the foot hooked through the sling, the butt was able to be placed at the shoulder, providing more support and steadiness in aiming.
But it was the use of the right leg to support the rifle, as illustrated here, showing the rifleman ‘Tom Plunkett’, whereby he shot a french general in perhaps the most famous feat of Baker marksmanship. As you can see here, great pains were taken to make sure that my feet were out of the way in all three versions of the supine position. It was the easiest by far to achieve that level of safety, as well as comfort and support of the rifle, using this right-leg method.
One thing that modern target-shooters don’t have to contend with when using the Supine position, is the wearing of infantry equipment. This proved to be an embuggerance of the highest degree, with the pouch having to be brought forward onto the right hip, and the powder horn moved to the rear behind the back, safely out of the way of any pan ignition. Subsequent to that, the cartredge box needed to be tilted to allow room for the stock and its position in the shoulder. This position, while effective, requires good practice, but because of its awkwardness, I don’t think that it would be chosen over a good prone supported version.
As mentioned in many of the works, riflemen of the era were encouraged to one: know their weapons inside and out, load them in the most effective way possible, and do to the nature of their work -that being light infantry- they would’ve been free to adopt these positions as they saw fit.
As usual, thanks for watching.
by J Hines
Sources: Paul Huard, British Muzzle Loaders Youtube, Wikipedia, Historical Twist Store (baker rifle photo), USMC