
Review: Quick Enhancements for Marlin Leverguns
Whether original Marlin or “Remlin”, there are some easy upgrades that can be made:
Adjust Sights:
While I do like using iron sights on this particular rifle, I admit: The original buckhorn sights aren’t awesome. They’ve worked alright for hunting wild boar at close ranges, but shots past 100 yards get tricky. I worked up a table for my 3 primary hunting loads on this rifle as to where their point of impact is at what range on what rear sight elevation setting. Despite this, I don’t ever want to be fumbling with the rear sight elevator during a hunt. Back when I was testing out their new extractor claw, Ranger Point Precision was also nice enough to send me one of their front and rear sight assemblies to try out.
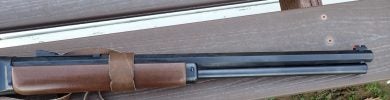
barrel with sights
The RPP rear sight assembly is adjustable for windage and elevation. (MSRP: $72.00 for front and rear sight assembly). Elevation adjustments are made via a hex screw that puts tension on the top of the barrel and moves the main body of the rear sight assembly up and down. The windage adjustments are made by loosening the aperture and drifting it to the appropriate location. Once windage is set, the windage screw can be fully tightened to lock everything into place. The front sight does not need to be drifted for adjustment. Once locked into place via hex-screw, there are two distinct quick aiming points one can use for quick shots at different ranges.
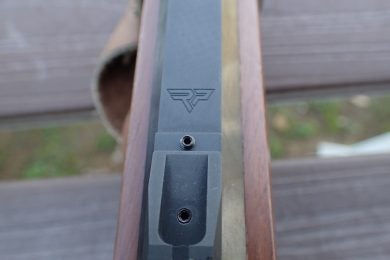
Top view of the RPP Rear sight. Note hex screws. Front is for elevation, rear for windage
Installation:
Marlin 1894 sights are pretty easy to remove. Once the rear sight elevator is removed, the rear sight can usually be drifted out right to left via finger pressure. The front sight assembly took a few hits with a brass punch to drift out. The new sights slid right into place and locked down easily with the hex screws. In direct sunlight, I found the two aiming points easy to use and the sights bright. It should be considered: if one anticipates frequent use in low-light or at night, there’s no substitute for putting on a red dot sight.
Rear sight assembly, not dovetail for windage adjustment
Front sight; note gap under sight
Something to note: These sights are CNC machined from 7075 aluminum and black anodized. They should therefore be rust-free. However, there is somewhat of a gap under the front and rear sight assembly above the barrel. The barrel underneath this gap should be cleaned and inspected for rust periodically. Check and clean these areas for rust immediately if one is using one’s rifle in humid or icy conditions frequently.
Trigger Happy:
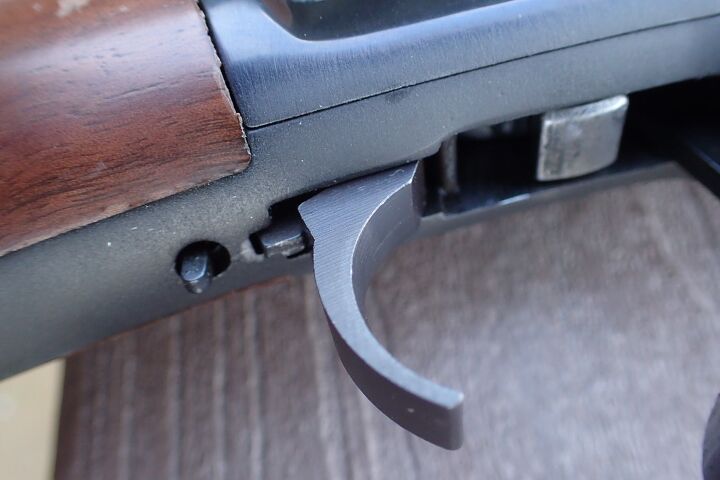
The trigger on my early-00’s Marlin was just adequate. It was very floppy, had quite a bit of creep, and the re was a rough hitch before breaking at 6lbs. The flop of the trigger was also rattly and loud when trying to stalk in on wild boar in the rough lava rock country that I usually hunt them in. I’ve experienced Wild West Guns’ triggers before, as I have one of their Alaskan Co-Pilots in .45-70. Knowing their triggers to be excellent, I ordered one of their “Trigger Happy Kits” (MSRP $100.00). This trigger is a precision CNC-machined 2-piece unit consisting of the trigger and sear held together with a hollow pin. The trigger can be had in either blued or stainless, depending on the look one is going for.
Installation:
While actually replacement of the trigger is easy, getting to the trigger assembly in one’s Marlin is a bit of a chore. There’s no quick way of getting at it, being that to do it properly, it requires removing the stock, bolt, and hammer assembly. Once done, one can remove the trigger and sear of the stock unit and install the new Trigger Happy Kit. This is also a good opportunity to do a detailed cleaning and oiling of one’s Marlin. Make sure to test proper safety, trigger, sear, and bolt function before finishing reassembly, as some later model Marlins may have troublesome interactions with the fit of the new sear, requiring minor fitting.
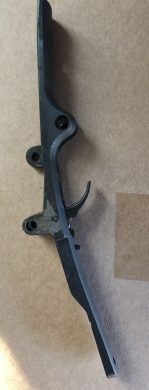
Trigger inserted into triggerguard plate
Improvement was immediately apparent. The flop and rattle was gone, replaced by a trigger that broke consistently at 2.75lbs, lower than the average advertised 4lbs. Not only was the pull weight reduced by half, but the new precision made trigger has a very crisp, clean break.
new trigger installed

the fit and finish on the WWG trigger was excellent
A new Follower:
The original Marlin 1894s have magazine tube followers that are made out of Zytel. While they are ok, mine started to hang up in the tube and the edges on the back of the hollow follower started to degrade somewhat over time. To alleviate this issue in the future, Wild West Guns’ CNC machined, anodized aluminum follower (MSRP $25.00) seemed like a good upgrade to add instead of replacing it with another Zytel or plastic follower.
Left: aluminum follower
Right: Happy Trigger Kit
Installation:
To install the new follower is pretty simple, just remove the end cap of one’s magazine tube, remove the magazine spring, and the old follower will drop out (if one has removed the appropriate magazine tube/barrel band screws depending on exact model). It’s also a good opportunity to clean and lightly lubricate one’s magazine tube assembly.
Testing after reassembly showed a definite improvement in loading the magazine tube and cycling flat point, hollow point, and Hornady Leverevolution polymer-tipped ammunition. Not only was loading the tube far smoother, it was also much quieter, eliminating the creak and squeak of the old follower.
Range Testing:
Upgraded with these three new improvements, I took my Marlin to the range to try things out. The much-improved trigger shone both in static shooting and for quickly ringing steel. There were no light strikes, malfunctions, or binding issues. The pull weight stayed consistent after live fire testing.
The new follower kept the cartridges coming as fast as I could cycle the action, and loading the rifle was markedly easier than in the past. I had no issues with any kind of ammunition hanging up or cycling improperly.
The new sights were nice, though the red on the front sight was somewhat hard to see under shade while shooting off the bench. I think that in the future, these sights could be aided by a triangular fiber optic insert at the top for more light collection. The sights were super simple to adjust, and stayed put once set. There is no separate screw to keep the adjustment in place, and that could be a good future improvement to make. They held up to more than 50 rounds of .44 Magnum without moving. To be sure they don’t budge while being rattled around in a side by side or saddle scabbard, some clear nail polish or preferred color of loctite should keep them in place.

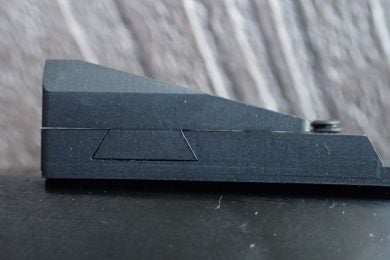
The aiming line and medium aperture of the RPP rear sight
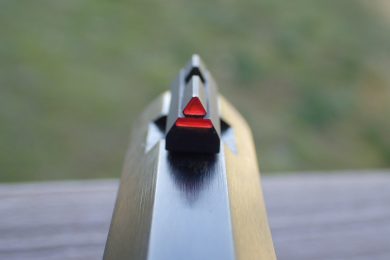
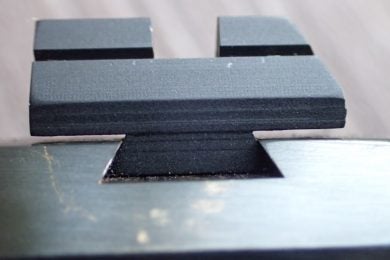
The two parts of the front sight aiming triangle
Overall, my shooting experience with this rifle was much improved. Loading and cycling were easier, and the groups tightened up at 50 and 100 yards with the new sights and much improved new trigger. My best group was .6″@50y, shot seated with the fore-end supported. The best group at 100y was 1.76″. I was not able to manage this kind of precision with the factory sights and trigger. Using the tip of the sight as my 50y zeroed aiming point and the line for my 100y point yielded an average POI at 100 1.5″ high of center with the American Eagle 240gr JSP load. The 2nd aiming point in my opinion is good for quick shots at these different ranges with the .44 magnum. Results will vary with different cartridges, barrel lengths and loads. As always, it’s best to test these things at the range before heading to the field.
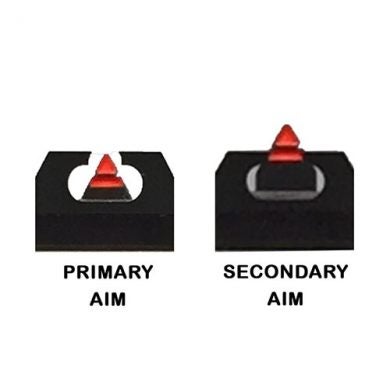
How to use the RPP sights
Photo Credit: Ranger Point Precision
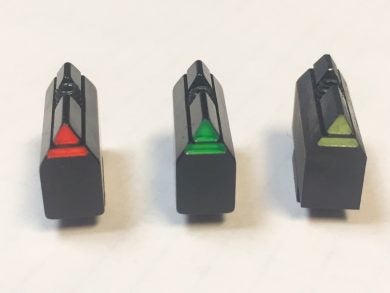
front sight color options
Photo credit: Ranger Point Precision
I look forward to continue using this Marlin with these enhancements as an excellent game-getter when hunting with friends and relatives in less permissive locales. Whether one has a nice old Marlin that needs some TLC, or a “Remlin” with some areas that could be improved, these all could be a positive enhancement. Sometimes it’s nice to update an old gun with some nicer features. Done right, it can greatly change one’s shooting experience for the better.
For more information, visit Ranger Point Precision or Wild West Guns
Thanks to Ranger Point Precision for the sights

Griffin Armament introduces the M4SDII sound suppressor
Lehigh Defense: Maximum expansion ammunition